Page 1 of 2 12 LastLast
Results 1 to 20 of 32

Thread: Wendellism's Guide on Blacksmoke Mountain - Underworld Eruptions

  1. #1
    Banned Wendellism's Avatar
    Join Date
    Mar 2013
    Location
    The Land Of Trolls. Graduated Medic from The Land Of Trolls.
    Posts
    717
    Thanks Thanks Given 
    71
    Thanks Thanks Received 
    73
    Thanked in
    55 Posts

    Default Wendellism's Guide on Blacksmoke Mountain - Underworld Eruptions

    My list of Guides
    Wendellism's Simple Maps on Blacksmoke Mountain!

    Contents

    I - Introduction
    II - Map Layout
    III - Strategy
    IV - Possible Loot
    V - Map History
    VI - Conclusion
    VII - Changelog


    Introduction

    Hello once again community. In this guide I will explain the map layout of Underworld Eruptions for those of us that had not tried this map as of yet. Feel free to present constructive criticism and feedback if you disagree on something.

    The Underworld Eruptions is one of Spacetime Studio's Premium Dungeons. Premium Dungeons are instances which all the bosses compared to other mini-dungeons or boss gauntlet, drops loots akin to each bosses in their respective instances. Premium dungeons thus requires 3 Platinum per entry, which means players have to earn Platinum via W3I or TrialPay in order to access the premium dungeon.

    For farmers that wish to farm here, they would require at least 165 platinum, as the time taken to clear this dungeon without a trasher party takes about 15 minutes, and 5-10 minutes with a thrasher party.
    Last edited by Wendellism; 04-26-2013 at 12:34 AM. Reason: v1.15

  2. The Following User Says Thank You to Wendellism For This Useful Post:


  3. #2
    Banned Wendellism's Avatar
    Join Date
    Mar 2013
    Location
    The Land Of Trolls. Graduated Medic from The Land Of Trolls.
    Posts
    717
    Thanks Thanks Given 
    71
    Thanks Thanks Received 
    73
    Thanked in
    55 Posts

    Default

    Map Layout

    Name:  3rd Part of BSM underworlds eruptions.png
Views: 709
Size:  16.7 KB
    Name:  2st Part of BSM underworlds eruptions.png
Views: 737
Size:  15.2 KB
    Name:  1st Part of BSM underworlds eruptions.png
Views: 713
Size:  12.0 KB
    Note: I'm not good at using Paint.NET to draw those maps, hopefully someone would make a detailed map regarding the maps of BlackSmoke Mountain. Lines aren't my thing so..... please bear with it for the time being ^^
    Last edited by Wendellism; 04-23-2013 at 10:40 PM.

  4. The Following 2 Users Say Thank You to Wendellism For This Useful Post:


  5. #3
    Banned Wendellism's Avatar
    Join Date
    Mar 2013
    Location
    The Land Of Trolls. Graduated Medic from The Land Of Trolls.
    Posts
    717
    Thanks Thanks Given 
    71
    Thanks Thanks Received 
    73
    Thanked in
    55 Posts

    Default

    Strategy

    How To: Speedrun

    So basically, when you and your party start from your very first spawn point in the bottommost map, after resching your first T junction, continue straight to battle Dragonet.

    Next backtrack from Dragonet's room to the T junction, and battle the Elite Firey Minions. Follow the path, whist killing every mob in your path, and battle KOAL. Ensure that everyone goes into the portal towards the second half of the map after KOAL is killed. You might want to kill the adds from KOAL's room to make sure no one is left behind.

    Once everyone made it through, split the party into groups of 2-3 and destroy mobs from both paths. After meeting up from the "Square" path, make your way towards the Dragonet Family, continue straight and battle Aunt Emma. Killing Aunt Emma unlocks the portal towards Onyx, so revive your friends from the encounter and fight Onyx and his healing adds. After killing it, get to the portal to your right of Onyx, which will send you back to where Aunt Emma is. Continue following the path, eventually towards a red crater nest where the Red Dragon lives.

    And that's all there is to it.

    Boss(es) Strategy

    Dragonet
    Type of Fight: Tank and Spank

    Take out the Monolith as the Monolith heals the Dragonet every 5 seconds. Killing it afterwards should be a breeze. Beware of the adds that might pop up at the start and during the encounter.

    Elite Firey Minions
    Type of Fight: Tank and Spank

    The Ursan minion would Beckon parties towards it, and the Avian Minion would push parties away from it. Similar to Forest Haven's Firey Minions, those bosses are easy and do not count as a boss. As a result, those bosses may not grant loot to all players, though there is a chance that they would drop Pink loot.

    KOAL
    Type of Fight: DPS race; Gear Check

    KOAL would Beckon parties towards him, and then makes a large AoE that could deal massive damage, and will free some of the 6 invulnerable adds around him. Parties should purely focus on Koal itself, as focusing on the adds in this case would waste time and could cause a wipe.

    Dragonet Family
    Type of Fight: Tank and Spank

    At the start of the encounter, 2 meteors would fall from the ceiling in 2 random areas of the room, creating lava puddles. Dragonito would then appear and do battle with the party. When a Dragonet's HP reaches 25>HP%, 2 more meteors would fall in 2 random areas of the room, and a Dragonet would spawn. Do note that Dragone is the final Dragonet to spawn in this encounter, thus killing him after killing Dragonito & Dragona grants the whole party loot.

    In total, 6 Meteors would fall to 6 random areas of the room, pushing players away from the area of impact, and 3 Dragonets would spawn, one by one.

    Aunt Emma
    Type of Fight: Gear Check

    Aunt Emma, reincarnated in the Underworld, will send waves of AoE damage that will deal more damage the further one is away from her, thus players should get close to her to minimize damage. However, similar to her encounter in Mount Fang, she would stop sending AoE damage waves, and instead charge up for 2-3 seconds to release a close ranged 7m AoE that could prove fatal to squishy classes such as birds and mages, so when she is charging, players should get away from her.

    A good sign that Aunt Emma is about to release her close ranged AoE is when she suddenly stops releasing her AoE waves per second.

    Onyx
    Type of Fight: Tank and Spank; Council Encounter

    This boss has 4 adds that heals him, and has splash damage. Firstly, take out his adds when they start to emit a green-orb like aura; it means the add has temporary lost it's invulnerability while it is healing the boss. After killing all 4 adds, take out Onyx. Ensure mages do their job spam healing the party during this encounter.

    Red Dragon
    Type of Fight: Battle For Survival

    This boss is feared by most parties, and it truly deserved it's reputation. This boss is the strongest boss in Blacksmoke Mountain, even the Elite Red Dragon couldn't compare to his ferocity.

    Now first and foremost, the party should make a formation like this. Special Thanks to FusionStrike for the pic.
    Name:  battlefield reset line.png
Views: 635
Size:  131.2 KB
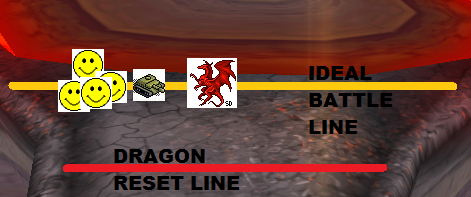
    Now against the Red Dragon, make sure none of your friends run beyond the Reset line. Kill the mobs first and foremost, as rushing down the Red Dragon only summons even more mobs, which would overwhelm you and your party, even with thrasher.

    The Red Dragon would clear all aggro stacked on it and smash the ground, sending any members not in that position away from him, and summoning another wave of adds for every 1/4 of his HP remaining. This means the red dragon would summon mobs on 3/4, 1/2 and 1/4 of it's Base HP. Killing it after it's third aggro clear will not take away the mobs, so the party should leave and remake after the Red Dragon is killed.
    Last edited by Wendellism; 04-23-2013 at 10:40 PM.

  6. The Following 3 Users Say Thank You to Wendellism For This Useful Post:


  7. #4
    Banned Wendellism's Avatar
    Join Date
    Mar 2013
    Location
    The Land Of Trolls. Graduated Medic from The Land Of Trolls.
    Posts
    717
    Thanks Thanks Given 
    71
    Thanks Thanks Received 
    73
    Thanked in
    55 Posts

    Default

    Possible Loot

    Here are a list of Pinks available as loot while farming in Underworld Eruptions. Please do note that Pink equipment at level 75 has L75 before the item name. Also, at level 75 and above, crafting materials will be added to the table.

    Helms

    Sharp Dragonscale Helmet
    Req: Level 75/157 Base INT Stats: 40 Int, 5% Hit, 11% Crit, 3 Health, 5 H/s, 5 Mana, 5 M/s, 26 Damage, 47 Armor
    Req: Level 73/151 Base INT Stats: 40 Int, 5% Hit, 11% Crit, 3 Health, 5 H/s, 5 Mana, 5 M/s, 26 Damage, 46 Armor
    Req: Level 71/145 Base INT Stats: 40 Int, 5% Hit, 11% Crit, 3 Health, 5 H/s, 5 Mana, 5 M/s, 26 Damage, 45 Armor

    Beastly Dragonscale Helmet
    Req: Level 75/157 Base STR Stats: 40 Str, 7% Dodge, 5% Crit, 9 Health, 6 H/s, 5 M/s, 22 Damage, 64 Armor
    Req: Level 73/151 Base STR Stats: 40 Str, 7% Dodge, 5% Crit, 9 Health, 6 H/s, 5 M/s, 22 Damage, 63 Armor
    Req: Level 71/145 Base STR Stats: 40 Str, 7% Dodge, 5% Crit, 9 Health, 6 H/s, 5 M/s, 22 Damage, 62 Armor

    Flying Dragonscale Helmet
    Req: Level 75/157 Base DEX Stats: 40 Dex, 12% Hit, 8% Crit, 4 H/s, 3 Mana, 5 M/s, 26 Damage, 60 Armor
    Req: Level 73/151 Base DEX Stats: 40 Dex, 12% Hit, 8% Crit, 4 H/s, 3 Mana, 5 M/s, 26 Damage, 59 Armor
    Req: Level 71/145 Base DEX Stats: 40 Dex, 12% Hit, 8% Crit, 4 H/s, 3 Mana, 5 M/s, 26 Damage, 58 Armor

    Weapons

    Beastly Dragonscale Blade
    Req: Level 75/157 Base STR Stats: 260-334 Damage, 1.3 Speed, 40 Str, 7% Dodge, 5% Crit, 9 Health, 6 H/s, 5 M/s, 16 Armor
    Req: Level 73/151 Base STR Stats: 254-330 Damage, 1.3 Speed, 40 Str, 7% Dodge, 5% Crit, 9 Health, 6 H/s, 5 M/s, 16 Armor
    Req: Level 71/145 Base STR Stats: 250-324 Damage, 1.3 Speed, 40 Str, 7% Dodge, 5% Crit, 9 Health, 6 H/s, 5 M/s, 16 Armor

    Beastly Dragonscale Scythe
    Req: Level 75/157 Base STR Stats: 234-254 Damage, 0.9 Speed, 40 Str, 7% Dodge, 5% Crit, 9 Health, 6 H/s, 5 M/s, 16 Armor
    Req: Level 73/151 Base STR Stats: 230-250 Damage, 0.9 Speed, 40 Str, 7% Dodge, 5% Crit, 9 Health, 6 H/s, 5 M/s, 16 Armor
    Req: Level 71/145 Base STR Stats: 225-245 Damage, 0.9 Speed, 40 Str, 7% Dodge, 5% Crit, 9 Health, 6 H/s, 5 M/s, 16 Armor

    Sharp Dragonscale Staff
    Req: Level 75/157 Base INT Stats: 234-257 Damage, 1.1 Speed, 40 Int, 5% Hit, 11% Crit, 3 Health, 5 H/s, 5 Mana, 7 M/s, 12 Armor
    Req: Level 73/151 Base INT Stats: 229-252 Damage, 1.1 Speed, 40 Int, 5% Hit, 11% Crit, 3 Health, 5 H/s, 5 Mana, 7 M/s, 12 Armor
    Req: Level 71/145 Base INT Stats: 224-247 Damage, 1.1 Speed, 40 Int, 5% Hit, 11% Crit, 3 Health, 5 H/s, 5 Mana, 7 M/s, 12 Armor

    Sharp Dragonscale Scepter
    Req: Level 75/157 Base INT Stats: 162-190 Damage, 1.0 Speed, 40 Int, 5% Hit, 11% Crit, 3 Health, 5 H/s, 5 mana, 5 M/s, 10 Armor
    Req: Level 73/151 Base INT Stats: 158-187 Damage, 1.0 Speed, 40 Int, 5% Hit, 11% Crit, 3 Health, 5 H/s, 5 mana, 5 M/s, 10 Armor
    Req: Level 71/145 Base INT Stats: 155-184 Damage, 1.0 Speed, 40 Int, 5% Hit, 11% Crit, 3 Health, 5 H/s, 5 mana, 5 M/s, 10 Armor

    Flying Dragonscale Recurve Bow
    Req: Level 75/157 Base DEX Stats: 224-278 Damage, 0.9 Speed, 40 Dex, 12% Hit, 8% Crit, 4 H/s, 3 Mana, 5 M/s, 12 Armor
    Req: Level 73/151 Base DEX Stats: 219-274 Damage, 0.9 Speed, 40 Dex, 12% Hit, 8% Crit, 4 H/s, 3 Mana, 5 M/s, 12 Armor
    Req: Level 71/145 Base DEX Stats: 214-269 Damage, 0.9 Speed, 40 Dex, 12% Hit, 8% Crit, 4 H/s, 3 Mana, 5 M/s, 12 Armor

    Flying Dragonscale Talon
    Req: Level 75/157 Base DEX Stats: 152-168 Damage, 0.7 Speed, 40 Dex, 12% Hit, 8% Crit, 4 H/s, 3 Mana, 5 M/s, 12 Armor
    Req: Level 73/151 Base DEX Stats: 149-165 Damage, 0.7 Speed, 40 Dex, 12% Hit, 8% Crit, 4 H/s, 3 Mana, 5 M/s, 12 Armor
    Req: Level 71/145 Base DEX Stats: 146-162 Damage, 0.7 Speed, 40 Dex, 12% Hit, 8% Crit, 4 H/s, 3 Mana, 5 M/s, 12 Armor

    Armors

    Flying Dragonscale Armor
    Req: Level 75/157 Base DEX Stats: 40 Dex, 12% Hit, 8% Crit, 4 H/s, 3 Mana, 5 M/s, 26 Damage, 81 Armor
    Req: Level 73/151 Base DEX Stats: 40 Dex, 12% Hit, 8% Crit, 4 H/s, 3 Mana, 5 M/s, 26 Damage, 80 Armor
    Req: Level 71/145 Base DEX Stats: 40 Dex, 12% Hit, 8% Crit, 4 H/s, 3 Mana, 5 M/s, 26 Damage, 78 Armor

    Beastly Dragonscale Armor
    Req: Level 75/157 Base STR Stats: 40 Str, 7% Dodge, 5% Crit, 9 Health, 6 H/s, 5 M/s, 22 Damage, 87 Armor
    Req: Level 73/151 Base STR Stats: 40 Str, 7% Dodge, 5% Crit, 9 Health, 6 H/s, 5 M/s, 22 Damage, 85 Armor
    Req: Level 71/145 Base STR Stats: 40 Str, 7% Dodge, 5% Crit, 9 Health, 6 H/s, 5 M/s, 22 Damage, 83 Armor

    Sharp Dragonscale Armor
    Req: Level 75/157 Base INT Stats: 40 Int, 5% Hit, 11% Crit, 3 Health, 5 H/s, 5 Mana, 5 M/s, 26 Damage, 82 Armor
    Req: Level 73/151 Base INT Stats: 40 Int, 5% Hit, 11% Crit, 3 Health, 5 H/s, 5 Mana, 5 M/s, 26 Damage, 80 Armor
    Req: Level 71/145 Base INT Stats: 40 Int, 5% Hit, 11% Crit, 3 Health, 5 H/s, 5 Mana, 5 M/s, 26 Damage, 78 Armor

    Shields

    Flying Dragonscale Wing
    Req: Level 75/157 Base DEX Stats: 40 Dex, 12% Hit, 8% Crit, 4 H/s, 3 Mana, 5 M/s, 26 Damage, 72 Armor
    Req: Level 73/151 Base DEX Stats: 40 Dex, 12% Hit, 8% Crit, 4 H/s, 3 Mana, 5 M/s, 26 Damage, 70 Armor
    Req: Level 71/145 Base DEX Stats: 40 Dex, 12% Hit, 8% Crit, 4 H/s, 3 Mana, 5 M/s, 26 Damage, 68 Armor

    Beastly Dragonscale Buckler
    Req: Level 75/157 Base STR Stats: 40 Str, 7% Dodge, 5% Crit, 9 Health, 6 H/s, 5 M/s, 22 Damage, 76 Armor
    Req: Level 73/151 Base STR Stats: 40 Str, 7% Dodge, 5% Crit, 9 Health, 6 H/s, 5 M/s, 22 Damage, 74 Armor
    Req: Level 71/145 Base STR Stats: 40 Str, 7% Dodge, 5% Crit, 9 Health, 6 H/s, 5 M/s, 22 Damage, 72 Armor

    Sharp Dragonscale Eye
    Req: Level 75/145 Base INT Stats: 40 Int, 5% Hit, 11% Crit, 5 H/s, 5 Mana, 5 M/s, 26 Damage, 70 Armor
    Req: Level 73/145 Base INT Stats: 40 Int, 5% Hit, 11% Crit, 5 H/s, 5 Mana, 5 M/s, 26 Damage, 68 Armor
    Req: Level 71/145 Base INT Stats: 40 Int, 5% Hit, 11% Crit, 5 H/s, 5 Mana, 5 M/s, 26 Damage, 66 Armor

    Crafting Materials

    Recipe: L75 Dexterity Armor
    Recipe: L75 Dexterity Helm
    Recipe: L75 Crafted Bow
    Recipe: L75 Crafted Talon
    Recipe: L75 Crafted Wing
    Recipe: L75 Strength Armor
    Recipe: L75 Strength Helmet
    Recipe: L75 Crafted 2H Sword
    Recipe: L75 Crafted Scythe
    Recipe: L75 Crafted Shield
    Recipe: L75 Smarts Robe
    Recipe: L75 Smarts Helm
    Recipe: L75 Crafted Staff
    Recipe: L75 Crafted Wand
    Recipe: L75 Crafted Eye
    Natural Red Diamond


    Hawkeye Gem
    Presto's Gem
    Gladiator's Gem


    The following items has been discontinued from the main expansion prior to the Blacksmoke Mountain Crafting Update.This means if you have this, you could possibly sell it for perhaps a gold cap in the next expansion.

    Sharp Dragonscale Wand
    Req: Level 75/157 Base INT Stats: 162-190 Damage, 1.0 Speed, 40 Int, 5% Hit, 11% Crit, 3 Health, 5 H/s, 5 Mana, 5 M/s, 10 Armor
    Req: Level 73/151 Base INT Stats: 158-187 Damage, 1.0 Speed, 40 Int, 5% Hit, 11% Crit, 3 Health, 5 H/s, 5 Mana, 5 M/s, 10 Armor
    Req: Level 71/145 Base INT Stats: 155-184 Damage, 1.0 Speed, 40 Int, 5% Hit, 11% Crit, 3 Health, 5 H/s, 5 Mana, 5 M/s, 10 Armor

    For more information and extra analyzations regarding those pinks, feel free to check out Whirlzap's List of Pinks from the link down below. Thanks Whirlzap!

    Last edited by Wendellism; 04-23-2013 at 10:40 PM.

  8. The Following 2 Users Say Thank You to Wendellism For This Useful Post:


  9. #5
    Banned Wendellism's Avatar
    Join Date
    Mar 2013
    Location
    The Land Of Trolls. Graduated Medic from The Land Of Trolls.
    Posts
    717
    Thanks Thanks Given 
    71
    Thanks Thanks Received 
    73
    Thanked in
    55 Posts

    Default

    Map History


    This map was extremely popular upon it's release, as many players with platinum would farm there since pinks drops much better while in this dungeon. The map reached it's peak when Crafting for Blacksmoke Mountain is released. Back then, Diamonds drop easily and could be sold for 1-1.3m. The map itself became a gold sink.

    However, ever since Diamonds have dropped in value ever since the Elite Dungeon and Forgotten Forest is released, this map is neglected since Forgotten Forest is the main area where players go to obtain equipment. Thus it's safe to say that this map drops both Crafting Materials and Equipment, and has a better chance of obtaining them, but not many people wants to spend the amount of platinum just for 7 chances at pinks.
    Last edited by Wendellism; 04-23-2013 at 10:39 PM.

  10. #6
    Banned Wendellism's Avatar
    Join Date
    Mar 2013
    Location
    The Land Of Trolls. Graduated Medic from The Land Of Trolls.
    Posts
    717
    Thanks Thanks Given 
    71
    Thanks Thanks Received 
    73
    Thanked in
    55 Posts

    Default

    Conclusion

    And with that, I hope you guys have enjoyed my guide, especially for new players, and I do hope to see more Underworld Eruption Runs anytime soon.

    As always, feel free to leave a comment if you feel that something is wrong with my guide. I'll greatly appreciate it.


    Changelog
    Version 1.15 - Added link with any possible future guides I made.
    Version 1.1 - Fixed the Possible Loot section to make it look presentable. Thanks Apollo!
    Version 1.0 - Created Guide.
    Last edited by Wendellism; 04-25-2013 at 11:23 PM. Reason: V.1.1

  11. #7
    Senior Member ThePvpTwink's Avatar
    Join Date
    Oct 2011
    Location
    Bay Area, CA
    Posts
    2,550
    Thanks Thanks Given 
    178
    Thanks Thanks Received 
    86
    Thanked in
    81 Posts

    Default

    Good luck! can't wait to see this new guide :P Im just starting black smoke mt.
    PL:Xxkoopyxx~Xpertfarmer~Avianftw~Ithepvptwink~ Expertfarmer~Gratuity~Theaviantwink~Bearocalypsed~ Tehmagetwink~Tehbeartwink~Koopymerch+more AL:Thepvptwink~Xxkoopyxx~Ithepvptwink SL: Thepvptwink DL: Thepvptwink

  12. #8
    Banned Wendellism's Avatar
    Join Date
    Mar 2013
    Location
    The Land Of Trolls. Graduated Medic from The Land Of Trolls.
    Posts
    717
    Thanks Thanks Given 
    71
    Thanks Thanks Received 
    73
    Thanked in
    55 Posts

    Default

    Guide is up and running! =)

  13. #9
    Member
    Join Date
    Jan 2012
    Posts
    63
    Thanks Thanks Given 
    3
    Thanks Thanks Received 
    8
    Thanked in
    6 Posts

    Default

    In this map there is no need to kill the Onyx minions. Just kill Onyx. Different story then in the elite map version.
    igns are a bunch of *blatta*and *zzzet*

  14. #10
    Banned Wendellism's Avatar
    Join Date
    Mar 2013
    Location
    The Land Of Trolls. Graduated Medic from The Land Of Trolls.
    Posts
    717
    Thanks Thanks Given 
    71
    Thanks Thanks Received 
    73
    Thanked in
    55 Posts

    Default

    Quote Originally Posted by blatta View Post
    In this map there is no need to kill the Onyx minions. Just kill Onyx. Different story then in the elite map version.
    I believe I was making this guide for the..... less priviledged. (don't have Elixir)

  15. #11
    Senior Member McBain's Avatar
    Join Date
    Aug 2011
    Posts
    1,362
    Thanks Thanks Given 
    39
    Thanks Thanks Received 
    115
    Thanked in
    101 Posts

    Default

    Is this map still available? I thought it was replaced by the forest one? I don't think I've seen anyone running it ages, anyway.
    PL: Seucheky
    SL: McBain
    DL: ArethaFanglin
    AL: McBain, Seucheky

  16. #12
    Banned Wendellism's Avatar
    Join Date
    Mar 2013
    Location
    The Land Of Trolls. Graduated Medic from The Land Of Trolls.
    Posts
    717
    Thanks Thanks Given 
    71
    Thanks Thanks Received 
    73
    Thanked in
    55 Posts

    Default

    This Map is still available when Blacksmoke Mountain was officially released. Perhaps were you asking about Blacksmoke Mountain - Fire Forest?

    On a side note, I hope this is posted to the Player Guide section. I spent 3 hours working on this. xD
    Last edited by Wendellism; 04-23-2013 at 06:47 AM.

  17. #13
    Luminary Poster
    Join Date
    Sep 2012
    Posts
    7,274
    Thanks Thanks Given 
    955
    Thanks Thanks Received 
    939
    Thanked in
    615 Posts

    Default

    Quote Originally Posted by Wendellism View Post
    This Map is still available when Blacksmoke Mountain was officially released. Perhaps were you asking about Blacksmoke Mountain - Fire Forest?

    On a side note, I hope this is posted to the Player Guide section. I spent 3 hours working on this. xD
    You have to PM a dev to move this to player guide section. Nice guide tho

  18. #14
    Banned Wendellism's Avatar
    Join Date
    Mar 2013
    Location
    The Land Of Trolls. Graduated Medic from The Land Of Trolls.
    Posts
    717
    Thanks Thanks Given 
    71
    Thanks Thanks Received 
    73
    Thanked in
    55 Posts

    Default

    Quote Originally Posted by Reun View Post
    You have to PM a dev to move this to player guide section. Nice guide tho
    Whoa, thanks for liking it! It's really nice to see others are happy with my work.

  19. #15
    Luminary Poster Caiahar's Avatar
    Join Date
    Nov 2012
    Location
    The Castle That Never Was, with my Shadowstar and Eternal Frost, also with Ebonine.
    Posts
    6,446
    Thanks Thanks Given 
    343
    Thanks Thanks Received 
    464
    Thanked in
    368 Posts

    Default

    Awesome guide!

    All for One, and One for All!
    The Brightest of Flames..cast the Darkest of Shadows..
    One who knows nothing cannot understand anything..

  20. #16
    Banned Wendellism's Avatar
    Join Date
    Mar 2013
    Location
    The Land Of Trolls. Graduated Medic from The Land Of Trolls.
    Posts
    717
    Thanks Thanks Given 
    71
    Thanks Thanks Received 
    73
    Thanked in
    55 Posts

    Default

    Quote Originally Posted by Shadowstar View Post
    Awesome guide!
    Thanks mate! =)

  21. #17
    Forum Adept
    Join Date
    Aug 2012
    Posts
    292
    Thanks Thanks Given 
    0
    Thanks Thanks Received 
    7
    Thanked in
    7 Posts

    Default

    Uh, you may need to adjust this guide. Coming from someone who has defeated the elite red dragon 250+ times and the underworld dragon 300+ times, the underworld red dragon is a joke compared to the elite red dragon.

  22. #18
    Banned Wendellism's Avatar
    Join Date
    Mar 2013
    Location
    The Land Of Trolls. Graduated Medic from The Land Of Trolls.
    Posts
    717
    Thanks Thanks Given 
    71
    Thanks Thanks Received 
    73
    Thanked in
    55 Posts

    Default

    Quote Originally Posted by Ogbuehi View Post
    Uh, you may need to adjust this guide. Coming from someone who has defeated the elite red dragon 250+ times and the underworld dragon 300+ times, the underworld red dragon is a joke compared to the elite red dragon.
    Nope. From my experiences from battling Elite Red Dragon, it's safe to say that Elite Red Dragon is just a Tank And Spank as the boss HP in itself is too high. This means the party has ample time to clear the mobs fast, then focus fire on the boss. Personally I would even state that Elite Red Dragon is a joke.

    The Red Dragon(not elite), is much more of a challenge compared to it's buffed up cousin as most classes would attack the mobs with AoE almost always, this in turn affects the Red dragon and when he loses 1/4 of his HP, he simply summons more mobs.

    So let me ask you, would you rather kill the add waves without worry from the Elite Red Dragon, or would you like to attack the same adds but risk annoying the Red Dragon which brings in more and more waves of adds at a faster interval compared to the Elite Red Dragon?

    Personally I would choose the first option.

  23. #19
    Forum Adept
    Join Date
    Aug 2012
    Posts
    292
    Thanks Thanks Given 
    0
    Thanks Thanks Received 
    7
    Thanked in
    7 Posts

    Default

    Quote Originally Posted by Wendellism View Post
    Nope. From my experiences from battling Elite Red Dragon, it's safe to say that Elite Red Dragon is just a Tank And Spank as the boss HP in itself is too high. This means the party has ample time to clear the mobs fast, then focus fire on the boss. Personally I would even state that Elite Red Dragon is a joke.

    The Red Dragon(not elite), is much more of a challenge compared to it's buffed up cousin as most classes would attack the mobs with AoE almost always, this in turn affects the Red dragon and when he loses 1/4 of his HP, he simply summons more mobs.

    So let me ask you, would you rather kill the add waves without worry from the Elite Red Dragon, or would you like to attack the same adds but risk annoying the Red Dragon which brings in more and more waves of adds at a faster interval compared to the Elite Red Dragon?

    Personally I would choose the first option.
    The problem with your analysis is that it takes significantly more time to kill the elite red dragon than it does to kill the regular red dragon. I've killed the regular red dragon in 30 seconds with 1 other person. A topnotch full party can kill the elite dragon in 5 minutes. Same team can kill the red dragon so fast, he can't even keep up with the waves he's trying activate by jumping off the screen. One time, we killed him so fast he didn't live long enough to activate the third wave of evil mages. Both dragons have the same number of waves. The elite dragon will require you to fight the same number of waves for even longer of time. He's not called elite for no reason.

  24. #20
    Banned Wendellism's Avatar
    Join Date
    Mar 2013
    Location
    The Land Of Trolls. Graduated Medic from The Land Of Trolls.
    Posts
    717
    Thanks Thanks Given 
    71
    Thanks Thanks Received 
    73
    Thanked in
    55 Posts

    Default

    Quote Originally Posted by Ogbuehi View Post
    The problem with your analysis is that it takes significantly more time to kill the elite red dragon than it does to kill the regular red dragon. I've killed the regular red dragon in 30 seconds with 1 other person. A topnotch full party can kill the elite dragon in 5 minutes. Same team can kill the red dragon so fast, he can't even keep up with the waves he's trying activate by jumping off the screen. One time, we killed him so fast he didn't live long enough to activate the third wave of evil mages. Both dragons have the same number of waves. The elite dragon will require you to fight the same number of waves for even longer of time. He's not called elite for no reason.
    Have you had your dosage of your elixir today? If not, care to play with a bunch of randoms without elixir charging towards the Red Dragon's Lair?

    And by the way, a true topnotch party can kill the Elite Red Dragon in less than a minute with thrashers.

    I rest my case.

Similar Threads

  1. Need help Last Quest of blacksmoke mountain
    By bglir in forum PL General Discussion
    Replies: 2
    Last Post: 02-18-2013, 02:14 AM
  2. 19/20 BlackSmoke mountain quests
    By nazgulking in forum PL Technical Issues and Bugs
    Replies: 0
    Last Post: 11-23-2012, 02:01 AM
  3. Blacksmoke Mountain Quests
    By jarikur in forum PL General Discussion
    Replies: 1
    Last Post: 11-06-2012, 08:56 AM
  4. Blacksmoke Mountain pic and video for fun!
    By LwMark in forum PL General Discussion
    Replies: 20
    Last Post: 10-09-2012, 09:14 PM

Bookmarks

Posting Permissions

  • You may not post new threads
  • You may not post replies
  • You may not post attachments
  • You may not edit your posts
  •