


In-Depth Guide to Farming Balefort Sewers
by Physiologic
Check out my other Pocket Legends guides:
How Drop Rates Work (Simplified) and the Factor of Luck Elixirs
Post-Global Cooldown (GCD) Video Runs at Balefort Sewers
Comprehensive Archer Skills and Equipment Guide
Complete Lv 55 Archer Gear List
Pocket Legends Enemy, Boss, and NPC Compendium
How to Craft Lv 55 Gear
How to calculate your attributes using STR, DEX, and INT
Ring List
Guide to Advanced Mechanics in PL: DPS, Crits, etc.
Void Set versus Sentinel equips: An Unbiased Analysis
In-Depth Guide to Farming Alien Oasis 3: Victory Lap
Check out my other Star Legends guides:
Star Legends General Attributes (STR, DEX, INT) Guide
Prefix/Suffix Compendium for Weapons and Armors
Lv 20-21 Operative Weapons and Equips
Table of Contents
I. Introduction
II. Sewer Techniques: Rush Bait, Grate Wait, Round Ups, the Death Train(TM)
III. Bandit Boy Hideout
IV. Bandit Boy Stronghold
V. The Catacombs
VI. Roach Motel
VII. Swill Pitz
VIII. Equipment: What is best to use at the Sewers?
IX. Thx and Revision History
I. Introduction
Greetings fellow farmers! If you are reading this you have already reached lv 50-55, or are at the brink of reaching those levels. This guide is intended to instruct players on how to farm each Balefort Sewer (abbreviated BS) maps as effectively and as expediently as possible. For that reason, this guide is directed primarily towards level 50+ players who already have a handle of how the game should be played.
To players who are reaching level 50+, this guide will educate you on how farming runs should feel like, so you have an idea on what to do when you are at your first Sewer games.
If you are below 50 and still wish to farm here, know that you should still level and have gear sufficient enough to tank hits well at Balefort Sewers as well as damage enemies/bosses effectively. This will be discussed further in the Gear section of the guide. Level and gear are still important, whether or not you consider yourself a good player, because a lv 55 farmer will have much higher damage and armor than you at lv 49, and you may be hindering the party's efforts to conduct fast runs.
To players already levels 50-55, have farmed extensively, and you are getting frustrated with slow public games and wiping out at bosses, you are not alone. Pub games can be atrocious because of its nature to pit random players in one uncoordinated party. Hopefully this guide may help players get a better understanding on how to develop certain Sewer techniques and to handle each boss more efficiently to create less stressful runs. In time, you may be making friends that work well with you and create your own private Sewer games!
II. Sewer Techniques: Rush Bait, Grate Wait, Round Ups, the Death Train(TM)
Aside from successful execution of combos, teamwork, and all that nonsense, there are 4 techniques you should know and/or master to expedite your Sewer runs.
Rush Bait
Rush baiting is having one person run slightly ahead of the party, getting mob aggro (by getting very close or using an AoE skill), and pulling back immediately, allowing your party to move in for the kill. If you want to lead your party and finish a map as fast as possible, you must absolutely master this to prevent unwarranted deaths. As an aggressive-style player, I commonly use this tactic in my own parties. How does this work well?
- The rush bait gains aggro from a large amount of mobs and maintains aggro while pulling back to a safe distance.
- Because the mob is focused on one character that has retreated to a safe distance, the other members of the party are free to immediately attack the mob.
- The other members of the party are temporarily free from any attacks due to the rush bait aggro and can kill or weaken the mob during this time.
Video example of rush bait: (will be added)
Grate Wait
Grates are scattered throughout the Sewers and may one hit kill any character despite how high their armor is. It's always best to simply wait for the grate to explode before proceeding to minimize time lost in reviving and time in which that player could have spent attacking enemies. These are current understandings of grate mechanics:
- A grate explosion is exactly 4 seconds from the moment the tinge of fire appears to the actual explosion where damage is incurred.
- In-between explosion time actually is variable anywhere from 5 seconds to 7 seconds.
- Grates can critically hit you and may be fatal in some cases.
- Grates possibly do more damage if more than one person is walking on top of the grate when it explodes.
- The exact mechanism of creating a 'premature grate explosion' (attacking it and causing it to explode before 4 seconds) is currently unknown.
Round Ups
This technique basically has one player (a tanking bear or a paladin usually) to "round up" mobs in certain areas of the map while other players wait in one area. As soon as the player returns with a massive amount of mobs behind him/her, the party unleashes as much damage as they can before the enemy mob attacks. I am not a big fan of round ups as there is a lot of room for error even in experienced parties, but this technique can still be helpful to those who know what they are doing.
Pros to round ups:
- Smart and carefully planned execution of combos can destroy huge enemy mobs quickly and easily.
- Allows party to stay as a single unit while attacking, allowing ease of combo execution and healing.
Cons to round ups:
- Players must "wait" for single player to round up. Comparing runs with round ups and runs without round ups has shown that there is no significant difference in speed of the run.
- Players may inadvertently die while they round up massive amounts of enemy mobs.
- If combos are not well-executed, massive enemy mobs may overcome players and cause deaths.
- Round ups are ideal when there are bears, birds, and mages in the party. Successfully eliminating enemy mobs may be harder especially if a mage or a bird is missing (Nature Strike combo is very crucial).
Video example of round ups: (will be added)
Death Train(TM)
Stylized as a militaristic group march from the start of the map to the end, your party essentially sticks together and runs without stopping while attacking and killing enemies as fast as possible. Your entire party works as one unit and the most important thing is to KEEP MOVING and never stop to kill. The biggest issue with public games is that most players don't trust each other enough to lead the front of the party, so everyone hesitates and stays back, expecting someone else to take the first hit. When your Death Train is properly executed, everyone gets attacked at the same time as soon as first mob contact occurs, distributing small damage among all team members as opposed to huge damage to one or two team members (and thus effectively killing them). If your party can agree to plow through together, enemies will literally vaporize as you chug along.
Video example of a Death Train finishing Bandit Boy Hideout in 3 minutes and 26 seconds. Note almost no party member hesitates and always attacks while moving:
III. Bandit Boy Hideout
The Balefort Sewers-1: Bandit Boy Hideout
NPC: Criminal Plan's Chest
Enemies Remaining: 100
Enemies: Sewer Warrior, Sewer Mage, Sewer Archer, Blanky the Safecrack (boss), Catspaw (boss), Gold Fever (boss)
Difficulty: Easy
Good map to use XP elixir? Yes
Good map to use damage elixir? No
Quite possibly the easiest map next to Swill Pitz, this is the first map in the Sewers campaign. You can use an XP elixir here for more experience points, as there are few dangers in this map. Be wary that the Sewer Archer enemies can still do very damaging Blast Shots when bunched together. Do not use a damage elixir as there is currently a glitch with the map's boss that may cause you to instantly die while you are on the damage elixir and the boss is aggroed onto you.
You can choose to ignore the right path in the first fork for time's sake, where Blanky the Safecrack may spawn, as it is unnecessary to clear to spawn Gold Fever. If you are running for experience points as well, you can clear this section out:
The map should be relatively straightforward from then on. Skip the left path that leads to grates, as it only brings you to a portal to the Bank Vault (where you don't want to go).
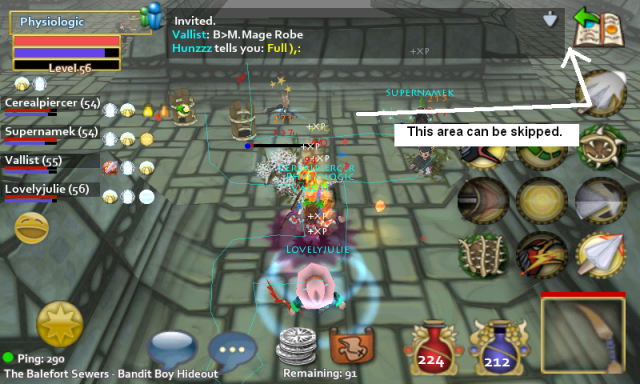
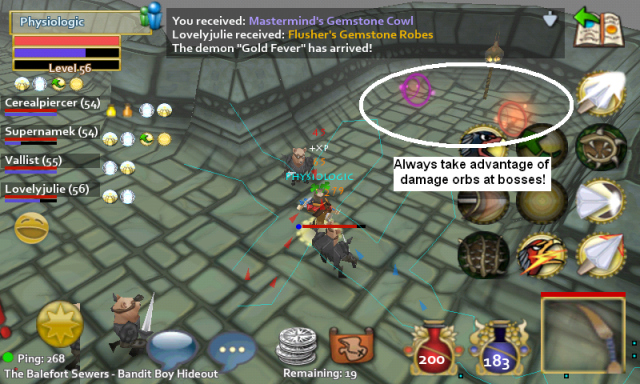
If red damage orbs are available right before Gold Fever, be sure to grab it especially if you're an archer. Even though they are temporary, your damage output will double, making your run faster:
Spam attacks at Gold Fever, keeping in mind that the person aggroed gets 'Gold Fever', or becomes a 5 second timebomb that explodes, damaging him/her and players around them and "infecting" affected players with 'Gold Fever' as well. It is highly likely that close proximity and subsequent explosion causes higher damage for both you and the Fevered player. Also during this time, Gold Fever's armor rises dramatically until the chest that is glowing green is destroyed. If you're Fevered, run away as far as you can from your party members and if you're not Fevered, run away from the Fevered player. Be very careful not to get aggro/Fevered while you have your damage elixir on, as it may cause an instant death for you.
Gold Fever
Gold Fever pink drops:
Raid Roach's Gemstone Leather
Raid Roach's Gemstone Cap
Mega Mage's Gemstone Robes
Mega Mage's Gemstone Cowl
Fury Fighter's Gemstone Plate
Fury Fighter's Gemstone Helm
Sewer King's Gemstone Scarab
Sewer Queen's Gemstone Robes
Royal Sewer Gemstone Plate
Royal Sewer Gem Battle Hammer
Video example:
IV. Bandit Boy Stronghold
The Balefort Sewers-2: Bandit Boy Stronghold
NPC: Chest of Notes
Enemies Remaining: 108
Enemies: Sewer Warrior, Sewer Mage, Sewer Archer, Drusila Badelf (boss), Bandit King (boss), Bandit Queen (boss)
Difficulty: Easy
Good map to use XP elixir? Yes
Good map to use damage elixir? Yes
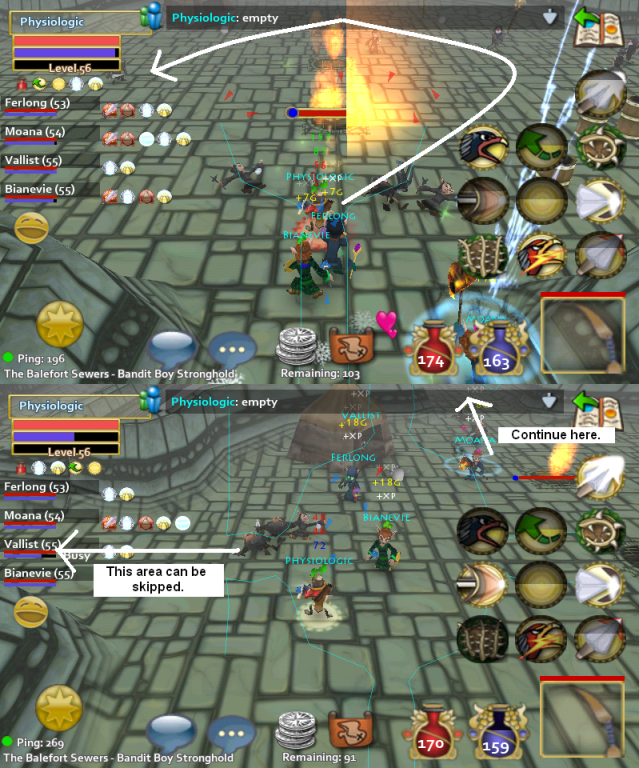
There are two ways you can approach the start of this map. First, you can either circle around counter-clockwise and pick off enemies as you plow through (avoiding the center 3 explosive grates), or you can have a player (bear or paladin) round up all the enemies as the rest of the party waits at the entrance. I also like to pop a damage elixir here to making this map go a bit faster, as it is fairly long and time-consuming. The leftmost path leads to the miniboss Drusila Badelf and about 10-12 enemies and is not necessary to go to unless you want some extra experience:
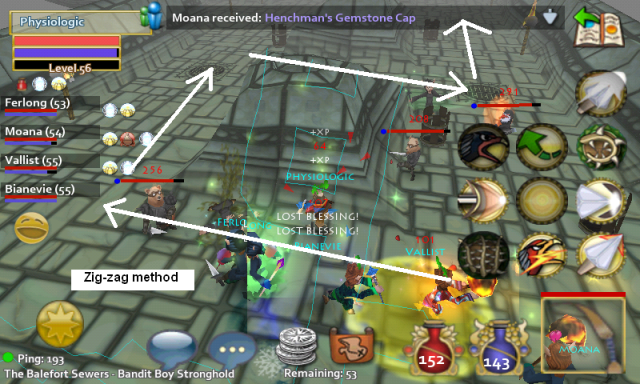
You can once again choose to either pick off enemies as you zigzag through this section or round up enemies if you wish. Be careful as there are many enemies and many grates all over this area:
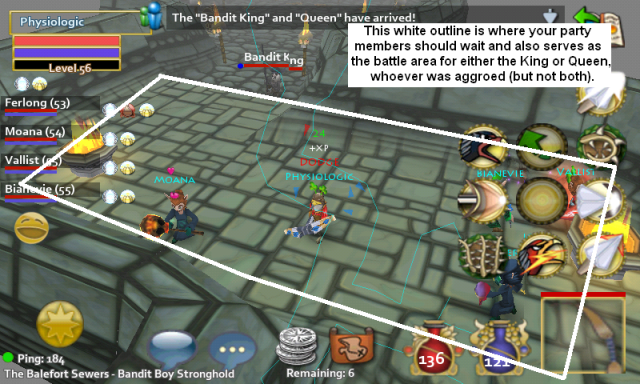
This can be one of these easiest boss fights in the Sewers, or one of the toughest, depending on how you do things. The easy method: Group up at the entrance before the big boss room and have only one party member run to the following location:
Bandit King and Queen
(Thanks noneo for this helpful tip; read more about it in this thread).
Important to note that the old aggro method does not work after the release of v1.7.0.1.
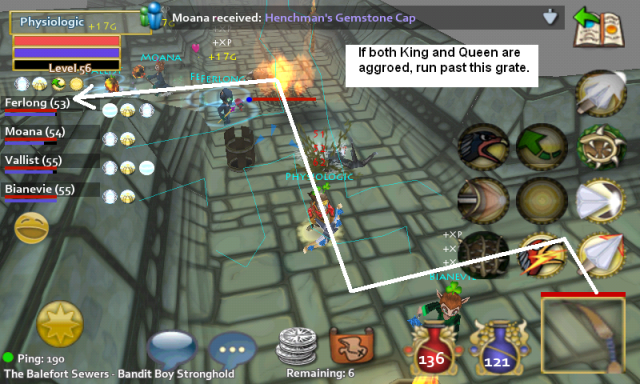
If done correctly, you'll gain aggro from only one of the bosses. If you happen to gain aggro from both bosses, tell your party "run" and have you and your party run past the last grate in that map:
After you gain aggro from one of the bosses (doesn't matter which), simply defeat the boss ensuring that the boss or your party does NOT find its way back into the big boss room where the other boss awaits. Afterwards, go inside the boss room and finish off the other boss.
If your party faces both bosses together, the King and Queen will unleash its deadly Beckon-Lightning combo which will pretty much ensure death regardless of how skilled your party is.
King and Queen pink drops:
Raid Roach's Gemstone Cap
Raid Roach's Gemstone Wing
Mega Mage's Gemstone Cowl
Mega Mage's Gemstone Bracer
Fury Fighter's Gemstone Helm
Fury Fighter's Gemstone Shield
Sewer King's Gemstone Leather
Sewer King's Gemstone Scarab
Sewer Queen's Gemstone Robes
Sewer Queen's Gemstone Staff
Video example:
V. The Catacombs
The Balefort Sewers-3: The Catacombs
NPC: Dead Sewer Slime
Enemies Remaining: 85
Enemies: Sewer Slime Melee, Sewer Slime Mage, Ooze (boss), Oil Slick (boss), Trash Heap (boss)
Difficulty: Medium
Good map to use XP elixir? Yes, but be cautious
Good map to use damage elixir? Yes
Exercise extreme caution when running this map because the Sewer Slime Mages (slimes with orange glowing fists) have a tendency to group up and hit multiple party members at a time with its AoE fireblasts. For that reason, try to target these enemies first. This is also a great map to utilize a rush bait, as long as the player is quick to retreat as soon as he/she gets aggro. Other than that, the map is relatively straight-forward. Right before the bossroom there is a single fork to the right that leads to the miniboss Oil Slick, who does not have to be killed for Trash Heap to spawn:
The large grates in the boss room will periodically explode at random intervals and damage your entire party. Previously (prior to patch v1.7.0.1), you could target a grate and destroy it so they no longer explode but this is no longer the case (see here for example).
Trash Heap
These grates cannot be destroyed, so they must be avoided throughout the entire fight. There is a hint of green gas that appears for about 4 seconds before the grate explodes, so be sure you're far away from them - they take out about 1/4 to 1/2 of your health. Sometimes, more than one grate explodes as well so careful kiting and avoiding Trash Heap's melee hits are imperative. If the fight goes on long enough, Trash Heap starts glowing green and ALL the grates in the map spews out green gas and they all explode, so its best if you kill Trash Heap as soon as possible without too much delay. There's no way to avoid this explosion (unless you run out of the boss room, but that takes quite some time as well).
Trash Heap pink drops:
Raid Roach's Gemstone Auto-Bow
Raid Roach's Gemstone Recurve
Mega Mage's Gem Shard Wand
Mega Mage's Gem Star Wand
Mega Mage's Gemstone Wand
Fury Fighter's Gemstone Sword
Sewer Queen's Gemstone Cowl
Royal Sewer Gemstone Plate
Royal Sewer Gemstone Helm
Royal Sewer Gem Battle Hammer
Video example:
VI. Roach Motel
The Balefort Sewers-4: Roach Motel
NPC: n/a
Enemies Remaining: 60
Enemies: Sewer Slime Melee, Sewer Slime Mage, Toxic Archer, Goop (boss), Stench (boss), Cockroach (boss)
Difficulty: Medium
Good map to use XP elixir? No
Good map to use damage elixir? No
Due to the length of the map and the small amount of enemies to face, it is not recommended to use XP or damage elixirs here.
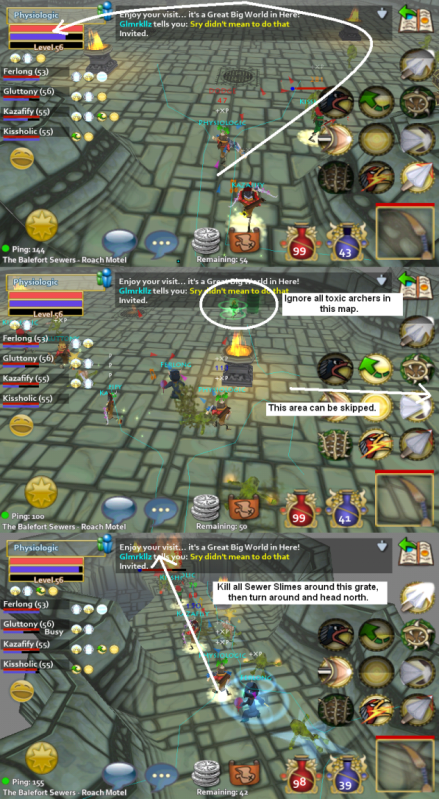
Once again you face the dreaded Sewer Slime Mages, so try to use a rush bait and clear the room from SE to NW, as there is a clear path in the middle in-between the two grates [thanks drewcapu for the fix]. Make sure you clear out the Sewer Slimes to the left of the huge room to ensure Cockroach spawns later (otherwise he probably won't). Skip the right path and move forward. You'll notice a new enemy in this map - green birds suspiciously bashing away at a toxic waste canister by themselves. Just avoid these birds altogether and if you get aggro, keep running away from them and they'll stop chasing you. They don't do too much damage but they have extraordinarily high health and are general nuisances while you fight Sewer Slimes. Make sure you don't touch their toxic waste canisters as well (you'll die if you do):
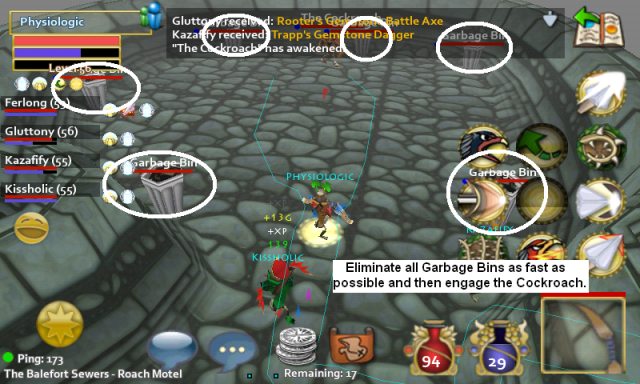
As you enter the boss room you are greeted with a bunch of Garbage Bins around the room and the Cockroach near the center. Make sure all your members go in at the same time. Systematically destroy all these bins as quickly as possible and then direct all your attacks at the Cockroach. The Garbage Bins when destroyed replenishes the Cockroach's health, so you're better off destroying them all first and then concentrating on the Cockroach, since the Cockroach starts off at full health anyway:
The Cockroach
Your other alternative is to attack only him and avoid the Garbage Bins, but that will prove much more difficult since your chaotic AoE attacks and combos may inadvertently destroy a single Garbage Bin, replenishing his health.
Also note that the Cockroach buffs up (saying 'Cockroach Powaaa!') and becomes stronger and stronger as the match progresses. You'll need to defeat him as fast as possible before he is strong enough to one-hit kill any party member. In addition, the Garbage Bins will respawn after some time (I believe it is a 30 second interval). Make sure archers stay far away from the Cockroach at all times, because the Cockroach can easily one-hit kill them easily.
The Cockroach pink drops:
Raid Roach's Gemstone Dagger
Mega Mage's Gem Blast Staff
Mega Mage's Gemstone Staff
Fury Fighter's Gemstone Battle Axe
Sewer King's Gemstone Leather
Sewer King's Gemstone Cap
Raid Roach's Gemstone Cap
Sewer King's Gemstone Scarab
Notes: RR Cap added by KaotiicxDream; SK Scarab added by MayhemMonkey
Video example:
VII. Swill Pitz
The Balefort Sewers-5: Swill Pitz
NPC: n/a
Enemies Remaining: 59
Enemies: Goblin Swordsman w/ Shield, Goblin Mage, Noodles (boss), Goblin King (boss)
Difficulty: Easy
Good map to use XP elixir? No
Good map to use damage elixir? No
Due to the length of the map and the small amount of enemies to face, it is not recommended to use XP or damage elixirs here.
As the final map in Balefort Sewers, Swill Pitz is surprisingly easy and short compared to Catacombs and Roach Motel. The hardest part of this map may be Cinco's Gauntlet near the beginning of the map, which is composed of 5 grates in a row, but you should be good at grate waiting by now:
In this section, run straight through in this direction, as all the enemies do not need to be killed for the Goblin King to spawn (and avoid all the little rooms containing those totems that spawn more goblins):
With enough firepower, this boss is a pushover but he can still rip apart half an archer's health in one melee hit. He should fall before he yells "Totem heal me!" or "This heals me, you see?" If he yells those phrases out, the giant totem besides him will start glowing green and after enough time passes it will replenish all his health. If your party is slow to defeat him and the totem starts to glow green, you can either try to finish him off as fast as possible BEFORE the totem heals him (roughly 7-8 seconds to finish him off) or you can direct all your party members to attack the totem to prevent it from healing him. In most cases, you'll be able to kill him before the totem heals - if not, just try again.
The Goblin King
The Goblin King pink drops:
Raid Roach's Gem Talon
Mega Mage's Gem Blast Staff
Fury Fighter's Gem Battle Sword
Fury Fighter's Gemstone Mace
Sewer King's Gemstone Scarab
Sewer Queen's Gemstone Staff
Sewer Queen's Gemstone Robes
Notes: SQ Robes added by AnotherAzi
Video example:
VIII. Equipment: What is best to use at the Sewers?
This is a commonly asked question by many new AND veteran players. Prior to BS's release, the AO3 sets and the Shadow Caves sets were considered the end-game gear at the time. Due to the dynamic nature of MMOs, gear will always be outdated by newer, better gear. Also prior to BS's release, orange, green and purple drops were considered 'trash loot' only worth liquidating, and many players wished for higher functionality from these poor pieces of equips.
Well, it's time to squelch the misconception that orange/green/purple drops are "only worth liquidating."
Cinco, head designer of Spacetime Studios, answered these prayers by releasing Sewer non-pink loots that actually DO work really well as equips. Whether you regard Cinco as a Savior or the supposed Angel of Death does not matter - the fact is that these non-pink Sewer drops are incredibly useful, as evidenced by my own use and many other players' use. You may think of them as a "poor man's" set of equips, but some combinations can still be as effective and as powerful as the pinks themselves.
Does that mean that lv 50 equips are useless? Absolutely not. Lv 50 equips can still be used in sewers and you don't necessarily have to switch immediately from your precious Void/Cosmos/Rift/Sentinel/Shadows/Hate sets to the Sewer loots. You may use your lv 50 equips to level up in Sewers while you save up for Sewer pinks. But keep in mind that a good party equipped with Sewer gear can still do runs slightly faster than a good party equipped with Lv 50 gear.
Ultimately, there is no 'best' gear to use, it is all in the matter of preference. Some people may prefer damage, some may prefer more armor for survivability. Some may like equips with h/s and m/s to reduce potion spending.
Here are gear lists for each class for your reference. Note that although this is just the lv 55 gear list, lv 51/53 gear is similar to level 55 ones but has slightly less damage (-2-5 damage or so). Also, only the lv 55 pinks create a set bonus and only in certain combinations.
Complete Lv 55 Archer Gear List
Complete Lv 55 Enchantress Gear List (by Mysticaldream)
Complete Lv 55 Warrior Gear List (by Ellyidol)
Archer Gear Setup
What I used from 50-53:
- Sentinel Talon/Wing set: Superb survivability and well-balanced, lacking in damage compared to certain Sewer combos
- Sentinel Shotgun set: Well-balanced, lacking in damage compared to certain Sewer combos
- Void/Cyber/Sunblessed sets: Can be used as well, but the Sentinel sets provide more damage and armor coverage.
- Acrobat's Fine Golden Band Req: Lv20, 67 Dex; 2% Dodge, 8 Armor OR
- Champion's Fine Platinum Band Lv20, 67 Dex; 2% Crit, 10 Damage
What I used from 53-55:
- Bagman's Gemstone Cap
- Bagman's Gemstone Recurve or Auto-Bow
- Bagman's Gemstone Leather
- Acrobat's Fine Golden Band Req: Lv20, 67 Dex; 2% Dodge, 8 Armor OR
- Champion's Fine Platinum Band Lv20, 67 Dex; 2% Crit, 10 Damage
Notes: Bagman's set is extremely powerful and nearly comparable to the Raid Roach set.
What I use at 56:
- Customized Crown of Persistence
- Bagman's Gemstone Recurve or Auto-Bow
- Bagman's Gemstone Leather
- Acrobat's Fine Golden Band Req: Lv20, 67 Dex; 2% Dodge, 8 Armor OR
- Champion's Fine Platinum Band Lv20, 67 Dex; 2% Crit, 10 Damage
These sets should last you up until you are able to afford Raid Roach or Sewer King. The Raid Roach set has the best damage/crit combination possible and the Sewer King set sacrifices crit for h/s and m/s for a more balanced character.
If survivability is an issue, i.e. you always seem to die, you may choose to use a combination of Drainer's and Henchman's:
- Drainer's Gemstone Cap
- Henchman's Gemstone Auto-Bow
- Drainer's Gemstone Leather
- Acrobat's Fine Golden Band Req: Lv20, 67 Dex; 2% Dodge, 8 Armor OR
- Champion's Fine Platinum Band Lv20, 67 Dex; 2% Crit, 10 Damage
Version 1.7.0.1 update: The Customized Recurve Set has received a huge set bonus boost, so it may actually be better to use than the Raid Roach set. However, the set itself is extremely expensive as it is currently very sought after.
Enchantress Gear Setup
This setup was provided by noneo (pure INT enchantress).
From lv 50-53:
- Keeper's Shadows set (Glow Stick/Creepy Doll): Best survivability and best overall, but expensive.
- Mystery set: Nearly inexpensive to obtain but lacks in armor and crit.
- Champion’s Fine Silver Ring: 2% Crit, 4 Armor, 20 Mana OR
- Fine Crystal Ring of Bravery: 1% Crit, 2 M/S, 5 DMG
Notes: Replace these sets with level 51/53 Sewer gear as you level (see below).
From lv 53-55:
- Mega Mage's Gemstone Cowl
- Sewer Queen's Gemstone Robes
- Lowman's Gemstone Wand
- Lowman's Gemstone Bracer
- Champion’s Fine Silver Ring: 2% Crit, 4 Armor, 20 Mana OR
- Fine Crystal Ring of Bravery: 1% Crit, 2 M/S, 5 DMG
Notes: Offers comparable stats to full Mega Mage set. Sewer Queen's Gemstone Robes can be replaced with Adept's Gemstone Robes but will be as equally effective at lower cost and at lower armor.
At lv 55-56:
- Mega Mage set (Wand/Bracer): This has by far the best armor, and overall performance. Many mages preach that M/S is critical, and honestly, this set goes overboard with M/S. I personally have 45 Mana regen. I can sit there and spam all of my spells, and not see my mana bar flinch. When the Global Cool Down (GCD) Comes into effect, the high M/S of this set will be a semi-waste. But the great armor and damage trumps that.
Alternative lv 55-56 build:
- Mega Mage's Gemstone Cowl
- Sewer Queen's Gemstone Robes
- Lowman's Gemstone Wand
- Lowman's Gemstone Bracer
- Champion’s Fine Silver Ring: 2% Crit, 4 Armor, 20 Mana OR
- Fine Crystal Ring of Bravery: 1% Crit, 2 M/S, 5 DMG
Notes: Best alternative gear to Mega Mage, and at a lower cost. Lowman's Gemstone Wand can be replaced with Scrubber's Gemstone Wand for more crit and hit% at the expense of less armor and regen.
Warrior Gear Setup
Ellyidol was kind enough to provide his past and current setups for gear.
From 50-55:
- Rift set: Start with this at level 50.
- Bodyguard set: Eventually replaces rift set as you level from 50 to 55
- Fury Fighter set: If affordable
Lv 56 tanking build:
- Royal Sewer Gemstone Helm
- Royal Sewer Gemstone Plate
- Rooter's Gemstone Sword
- Cleaner's Gemstone Shield
Alternative lv 56 tanking build (rich man's build):
- Royal Sewer Gemstone Helm
- Royal Sewer Gemstone Plate
- Fury Fighter's Gemstone Sword
- Fury Fighter's Gemstone Shield
Alternative lv 56 tanking build (poor man's build but can be as effective as other builds):
- Plunger's Gemstone Helm
- Plunger's Gemstone Plate
- Rooter's Gemstone Sword
- Cleaner's Gemstone Shield
At lv 56 (dex bear loadout):
- Customized Crown of Persistence: Received from his lv 56 bird; can be replaced with another dex helm.
- Sewer King's Gemstone Leather
- Bagman's Gemstone Auto-Bow/Recurve
Notes: Allows for enough regen and damage.
IX. Thx and Revision History
Feel free to make any necessary corrections or provide any type of criticism. Hope your Sewer runs are speedy and bountiful in pinks.
3/30/11: Guide created
4/5/11: Added some drops, revised some Cockroach strategies
4/14/11: Changed K/Q aggro strategy to reflect v1.7.0.1
4/15/11: Changed Trash Heap strategy to reflect 1.7.0.1


Bookmarks